
Pradeep Singh | 1st Aug 2016

Raspberry Pi is powerful enough to host any web application targeted for limited number of users. Typical use case could be an IoT application designed for Smart Home or Building.
Though you can have a full stack application (Web + App + DB) on raspberry Pi with SQLite or MySQL DB; here we are going to keep it simple with Web and App tiers.
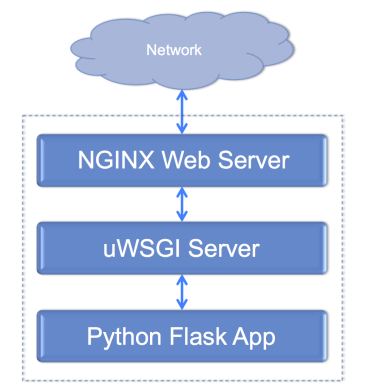
To execute Python Code with respect to the HTTP Request we need uWSGI Server between our Web Server and Python Web Application. In this example we are going to use “uwsgi” which is one of the most popular uWSGI Servers.
In following diagram you can see the information flow and placement of different components on Raspberry Pi –
Following steps will guide you through the installation and configuration of required packages to deploy a basic flask application –
1. Update and Upgrade Raspberry Pi packages:
Update Raspberry Pi packages –
sudo apt-get update
Upgrade Raspberry Pi Packages –
sudo apt-get upgrade
2. Install NGINX:
Install NGINX on Raspberry Pi with apt-get –
sudo apt-get install nginx
Start NGINX Service –
sudo service nginx start
To check the NGINX installation you can type Raspberry Pi’s ip address in your browser and you should see default NGINX page with “Welcome to nginx on Debian!” message.
3. Install Flask:
sudo pip install flask
4. Install uWSGI:
Install build-essentials and python-dev on Raspberry Pi –
sudo apt-get install build-essential python-dev
Install uWSGI using pip –
sudo pip install uwsgi
5. Create a simple Python Flask App:
Create a folder in “/home/pi” directory –
mkdir /home/pi/sampleApp
Change owner of this directory –
sudo chown www-data /home/pi/sampleApp
Create a new file named as “sample_app.py” in “/home/pi/sampleApp” directory –
sudo vi /home/pi/sampleApp/sample_app.py
Add following code to “sample_app.py” file –
from flask import Flask
first_app = Flask(__name__)

@first_app.route("/")
def first_function():
 return "<html><body><h1 style='color:red'>I am hosted on Raspberry Pi !!!</h1></body></html>"

if __name__ == "__main__":
 first_app.run(host='0.0.0.0')
6. Test Flask App with Python and uWSGI:
Execute “sample_app.py” file with following command. If you don’t see any error type Raspberry Pi’s IP Address with port 5000 in your browser (http://x.x.x.x:5000/) and you should see “I am hosted on Raspberry Pi !!!” in red color.
python /home/pi/sampleApp/sample_app.py
After testing Flask app with Python, you may want to test it with uWSGI –
cd /home/pi/sampleApp/

uwsgi --socket 0.0.0.0:8000 --protocol=http -w sample_app:first_app
Now you can test your app using port 8000 with Raspberry Pi’s IP Address (http://x.x.x.x:8000/)
7. create uWSGI Initialisation File:
create a new file named as “uwsgi_config.ini” in”/home/pi/sampleApp” directory –
sudo vi /home/pi/sampleApp/uwsgi_config.ini
Add following code to “uwsgi_config.ini” file –
[uwsgi]

chdir = /home/pi/sampleApp
module = sample_app:first_app

master = true
processes = 1
threads = 2

uid = www-data
gid = www-data
socket = /tmp/sample_app.sock
chmod-socket = 664
vacuum = true

die-on-term = true
8. Test uWSGI Initialisation File:
Execute following command –
uwsgi --ini /home/pi/sampleApp/uwsgi_config.ini
Open another session to Raspberry Pi and check if you have “sample_app.sock” file in “/tmp” directory –
ls /tmp/ |grep sample_app.sock
If you see “sample_app.sock” file in command output your configuration is correct.
9. Configure uWSGI to Auto-Start after Reboot:
Edit “/etc/rc.local” file using following command –
sudo vi /etc/rc.local
Add following command in this file before the line “exit 0” –
/usr/local/bin/uwsgi --ini /home/pi/sampleApp/uwsgi_config.ini --uid www-data --gid www-data --daemonize /var/log/uwsgi.log
10. Configure NGINX to Redirect Web Traffic to uWSGI (Reverse Proxy):
Remove “default” file from “/etc/nginx/sites-enabled/” –
sudo rm /etc/nginx/sites-enabled/default
Create a new file named as “sample_app_proxy” in “/etc/nginx/sites-available/” –
sudo vi /etc/nginx/sites-available/sample_app_proxy
Add following configuration in “sample_app_proxy” file –
server {
 listen 80;
 server_name localhost;

 location / { try_files $uri @app; }
 location @app {
 include uwsgi_params;
 uwsgi_pass unix:/tmp/sample_app.sock;
 }
}
Link “/etc/nginx/sites-available/sample_app_proxy” file to “/etc/nginx/sites-enabled” directory –
sudo ln -s /etc/nginx/sites-available/sample_app_proxy /etc/nginx/sites-enabled
Restart NGINX Service –
sudo service nginx restart
With this your Raspberry Pi is ready with a sample Python Flask Web Application. You can type Raspberry Pi’s IP Address in your web browser to access the HTML Page.

If you amended some file in your project you can reload uWSGI by adding “–touch-reload /home/pi/sampleApp/sample_app.py” to uWSGI start script in /etc/rc.local
LikeLike
Surely to access sqlite3 will be simple as you do it from within your Python app
LikeLike
Absolutely, I decided not to do that in this article to keep it simple 🙂
I used SQLite3 on Raspberry Pi, for following articles –
LikeLike
Something is making SCRIPT_NAME use port 8000 I can’t seem to remember what I did!! can I use something as below to let uwsgi manage it?
..
Starting your app with uwsgi
uwsgi is designed to operate on WSGI callables found in python modules.
Given a flask application in myapp.py, use the following command:
$ uwsgi -s /tmp/yourapplication.sock –manage-script-name –mount /yourapplication=myapp:app
The –manage-script-name will move the handling of SCRIPT_NAME to uwsgi, since its smarter about that. It is used together with the –mount directive which will make requests to /yourapplication be directed to myapp:app. If your application is accessible at root level, you can use a single / instead of /yourapplication. myapp refers to the name of the file of your flask application (without extension) or the module which provides app. app is the callable inside of your application (usually the line reads app = Flask(__name__).
LikeLike
Ok got it working I mixed up my sites-enabled and sites-available
LikeLike
I’ve got a 403 http error. Trying to figure out why… any thoughts?
LikeLike
Got it
For some reason the proxy file was not properly loaded and all http requests were sent to /var/www/html which doesn’t has any html page.
LikeLike
by doing this above process we can get html pages in flask by the device under different network from pi ?????
LikeLike
Getting a 502, bad gateway. Any help would be much appreciated!
LikeLike
sudo reboot
LikeLike
Did you find a solution? I have the same problem…
LikeLike