
Pradeep Singh | 27th Aug 2017

If you need a thin and functional Router for your virtual or physical host devices, you can create your own using Tiny Core (Core) image of Tiny Core Linux. In this article, I would show you how to configure this amazing Linux distro to function as an IP Router.
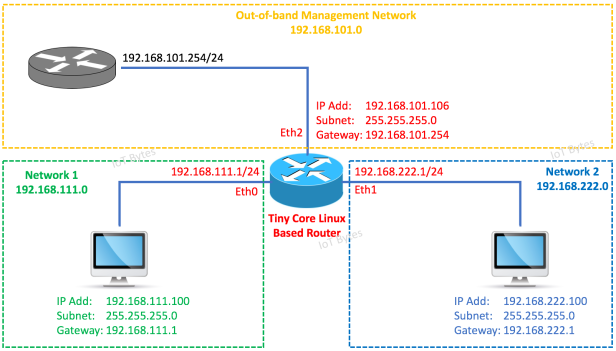
For this article, I would use the following topology. The Tiny Core based router has three Ethernet interfaces. Two of them (Eth0 and Eth1) are connected to 2 different Network segments (192.168.111.0 and 192.168.222.0) with static IP Address (191.168.111.1 and 192.168.222.1). These two interfaces would also be configured to act as HDCP Server for the respective host devices. Third Ethernet interface is used for out-of-band management and would get its IP Adress from the HDCP Server (192.168.101.254).
Let’s start and make an IP Router –
1. Configure Eth0 with Static IP and DHCP Server Configuration:
1.1 Create an ethernet interface configuration script for eth0 named as eth0.sh (/opt/eth0.sh) with the following contents –
#!/bin/sh

# If you are booting Tiny Core from a very fast storage such as SSD / NVMe Drive and getting
# "ifconfig: SIOCSIFADDR: No such Device" or "route: SIOCADDRT: Network is unreachable"
# error during system boot, use this sleep statemet, otherwise you can remove it -
sleep .5

# kill dhcp client for eth0
sleep 1
if [ -f /var/run/udhcpc.eth0.pid ]; then
kill `cat /var/run/udhcpc.eth0.pid`
sleep 0.1
fi

# configure interface eth0
ifconfig eth0 192.168.111.1 netmask 255.255.255.0 broadcast 192.168.111.255 up

# Start the DHCP Server Process once the Interface is Ready with the IP Add
sleep .1
sudo udhcpd /etc/eth0_udhcpd.conf &
1.2 Add the execute permissions to the eth0.sh script file using the following command –
sudo chmod 777 /opt/eth0.sh
tc@box:~$ sudo chmod 777  /opt/eth0.sh
tc@box:~$ ls -ltr /opt/ |grep eth0.sh
-rwxrwxrwx 1 root staff 178 Aug 19 16:02 eth0.sh
tc@box:~$
1.3 Create DHCP Server configuration for Eth0 interface named as eth0_udhcpd.conf (/etc/eth0_udhcpd.conf), with the following contents –
start 192.168.111.100
end 192.168.111.200
interface eth0
option subnet 255.255.255.0
option router 192.168.111.1
option lease 43200
option dns 192.168.111.1
option domain network1
2. Configure Eth1 with Static IP and DHCP Server Configuration:
2.1 Create an ethernet interface configuration script for eth1 named as eth1.sh (/opt/eth1.sh), with the following content –
#!/bin/sh

# If you are booting Tiny Core from a very fast storage such as SSD / NVMe Drive and getting
# "ifconfig: SIOCSIFADDR: No such Device" or "route: SIOCADDRT: Network is unreachable"
# error during system boot, use this sleep statemet, otherwise you can remove it -
sleep .5

# kill dhcp client for eth1
sleep 1
if [ -f /var/run/udhcpc.eth1.pid ]; then
kill `cat /var/run/udhcpc.eth1.pid`
sleep 0.1
fi

# configure interface eth1
ifconfig eth1 192.168.222.1 netmask 255.255.255.0 broadcast 192.168.222.255 up

# Start the DHCP Server Process once the Interface is Ready with the IP Add
sleep .1
sudo udhcpd /etc/eth1_udhcpd.conf &
2.2 Add the execute permissions to the eth1.sh script file using the following command –
sudo chmod 777 /opt/eth1.sh
tc@box:~$ sudo chmod 777 /opt/eth1.sh
tc@box:~$ ls -ltr /opt/eth1.sh
-rwxrwxrwx 1 root staff 641 Aug 26 20:04 /opt/eth1.sh
tc@box:~$
2.3 Create DHCP Server configuration for the Eth1 interface named as eth1_udhcpd.conf (/etc/eth1_udhcpd.conf), with the following contents-
start 192.168.222.100
end 192.168.222.200
interface eth1
option subnet 255.255.255.0
option router 192.168.222.1
option lease 43200
option dns 192.168.222.1
option domain network2
3. Make the configuration Persistent:
Execute following commands to make the configuration changes permanent –
sudo echo ‘/opt/eth0.sh’ >> /opt/.filetool.lst
sudo echo ‘/etc/eth0_udhcpd.conf’ >> /opt/.filetool.lst
sudo echo ‘/opt/eth0.sh &’ >> /opt/bootlocal.sh
sudo echo ‘/opt/eth1.sh’ >> /opt/.filetool.lst
sudo echo ‘/etc/eth1_udhcpd.conf’ >> /opt/.filetool.lst
sudo echo ‘/opt/eth1.sh &’ >> /opt/bootlocal.sh
filetool.sh -b
Following are the contents of my “/opt/.filetool.lst” and “/opt/bootlocal.sh” files –
tc@box:~$ cat /opt/.filetool.lst
opt
home
/opt/eth0.sh
/etc/eth0_udhcpd.conf
/opt/eth1.sh
/etc/eth1_udhcpd.conf
tc@box:~$
tc@box:~$ cat /opt/bootlocal.sh
#!/bin/sh
# put other system startup commands here
/opt/eth0.sh &
/opt/eth1.sh &
tc@box:~$
Reboot the system and check the IP Configration. I have eth2 connected with another network and it receives the IP Address from the DHCP Server.
tc@box:~$ ifconfig | grep dd
eth0 Link encap:Ethernet HWaddr 00:50:56:8F:1C:26
inet addr:192.168.111.1 Bcast:192.168.111.255 Mask:255.255.255.0
eth1 Link encap:Ethernet HWaddr 00:50:56:8F:24:3B
inet addr:192.168.222.1 Bcast:192.168.222.255 Mask:255.255.255.0
eth2 Link encap:Ethernet HWaddr 00:50:56:8F:66:17
inet addr:192.168.101.106 Bcast:192.168.101.255 Mask:255.255.255.0
inet addr:127.0.0.1 Mask:255.0.0.0
tc@box:~$
4. Configure SSH (Optional Steps):
You may want to enable SSH on your Tiny Core instance as it will allow you to change the config using ssh session. Following article will explain the details
Configure SSH Server on Tiny Core Linux
5. Enable Routing (IP Forwarding):
“IP Forwarding” or “kernel IP forwarding” is a feature of the Linux kernel. It allows the OS to exchange IP Packets between NIC Cards based on their IP Network targets. By default, IP Forwarding is disabled in most of the Linux based operating systems.
5.1 You can check the IP Forwarding status on Tiny Core using the following command –
sudo sysctl net.ipv4.ip_forward
If the value of “net.ipv4.ip_forward” is 0, it means IP Forwarding is Disabled.
5.2 You can enable IP Forwarding using the following command –
sudo sysctl -w net.ipv4.ip_forward=1
tc@box:~$ sudo sysctl net.ipv4.ip_forward
net.ipv4.ip_forward = 0
tc@box:~$
tc@box:~$ sudo sysctl -w net.ipv4.ip_forward=1
net.ipv4.ip_forward = 1
tc@box:~$
tc@box:~$ sudo sysctl net.ipv4.ip_forward
net.ipv4.ip_forward = 1
tc@box:~$
Note: You can also use “cat /proc/sys/net/ipv4/ip_forward” command to check the current status of IP Forwarding. Similarly you can use the command “echo 1 > /proc/sys/net/ipv4/ip_forward” to enable and”echo 0 > /proc/sys/net/ipv4/ip_forward” to disable it.
5.3 Make IP Forwarding Persistent by adding it into /opt/bootlocal.sh file using the following commands –
sudo echo “sudo sysctl -w net.ipv4.ip_forward=1” >> /opt/bootlocal.sh
filetool.sh -b
tc@box:~$ sudo echo "sudo sysctl -w net.ipv4.ip_forward=1" >> /opt/bootlocal.sh
tc@box:~$ filetool.sh -b
Backing up files to /mnt/sda1/tce/mydata.tgztc@box:~$
tc@box:~$
tc@box:~$ cat /opt/bootlocal.sh
#!/bin/sh
# put other system startup commands here
/usr/local/etc/init.d/openssh start &
/opt/eth0.sh &
/opt/eth1.sh &
sudo sysctl -w net.ipv4.ip_forward=1
tc@box:~$
Check your routing table using “route -n” command. Your routing table should look something like this –
tc@box:~$ route -n
Kernel IP routing table
Destination Gateway Genmask Flags Metric Ref Use Iface
0.0.0.0 192.168.101.254 0.0.0.0 UG 0 0 0 eth2
127.0.0.1 0.0.0.0 255.255.255.255 UH 0 0 0 lo
192.168.101.0 0.0.0.0 255.255.255.0 U 0 0 0 eth2
192.168.111.0 0.0.0.0 255.255.255.0 U 0 0 0 eth0
192.168.222.0 0.0.0.0 255.255.255.0 U 0 0 0 eth1
tc@box:~$
6. Test Connections:
After enabling IP Forwarding on your Tiny Core machine you can ping the hosts in Network 1 and Network 2 from each other.
Note: If you are using Windows Machines as hosts in Network 1 or Network 2, and facing issues with Ping tests, you may need to turn off Windows Firewall.
6.1 Ping test from Node 1 – Network 1 –

6.2 Ping test from Node 1 – Network 2 –

Conclusion:
With minimal system requirement, Tiny Core can fit into any computer hardware. If you are using virtual infrastructure, you can use this router for Inter VLAN routing too.
