
Pradeep Singh | 18th Aug 2017
![]()
The Tiny Core or the Core (a slim version of Tiny Core Linux) is an ultra-small operating system capable of booting from cd-rom, pen-drive, or frugally from a hard drive. It proves to be really useful for the application with one dedicated function, for example, DHCP, DNS, Switch, Router, Torrent Machine, IoT Applications etc.
In this article, we are going to explore the Tiny Core installation (frugal) process on a local disk.
1. Prepare Physical or Virtual Hardware:
As per Tiny Core Linux’s Wikipedia Page following are the System Requirements –
Minimal configuration: Tiny Core needs at least 46 MB of RAM in order to run, and Core requires at least 28 MB of RAM. The minimum CPU is an i486DX.
Recommended configuration: A Pentium 2 CPU and 128 MB of RAM are recommended for Tiny Core.
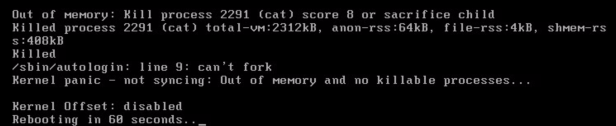
However, during my testing with a 64-bit Core image on a 64MB RAM Machine, I got “Kernel panic – not syncing: Out of memory and no killable processes…” error as shown in the following screenshot –
To be on a safer side I would recommend starting with 128 MB RAM on your Physical or Virtual Machine.
In case you are planning to install Tiny Core on VMware Virtual Machine with Fast NVMe or SATA SSDs, make sure you change the “Virtual Device Node” setting to “IDE 0” as the Tiny Core doesn’t recognize default SCSI device.

2. Download Tiny (Micro) Core Linux ISO:
Download the ISO Image from Tiny Core Linux home page (Link) –

After downloading the ISO Image, prepare and connect a CD or USB boot device to the Physical Machines. In the case of Virtual Machine, mount the ISO image to the virtual CD Drive connected to the VM that you created in the previous step.
You may also have to change the Boot Order/Device in the BIOS Settings so that the Machine can boot from the mounted ISO Image.
3. Install Tiny (Micro) Core Linux on Local Disc:
3.1 Boot the machine from the bootable media containing the downloaded ISO Image.
Once the boot process gets completed, you can check the version of Core Linux using “version” command. I am using Core 8.0 for this article.
tc@box:~$ version
8.0
tc@box:~$
3.2 Download the “tc-install” installation module using the following command –
tce-load -wi tc-install
Following is the console output for this command –
tc@box:~$ tce-load -wi tc-install
tc-install.tcz.dep OK
mtools.tcz.dep OK
Downloading: syslinux.tcz
Connecting to repo.tinycorelinux.net (89.22.99.37:80)
syslinux.tcz         100% |*******************************|  2628k  0:00:00 ETA
syslinux.tcz: OK
Downloading: perl5.tcz
Connecting to repo.tinycorelinux.net (89.22.99.37:80)
perl5.tcz            100% |*******************************| 13432k  0:00:00 ETA
perl5.tcz: OK
Downloading: glibc_gconv.tcz
Connecting to repo.tinycorelinux.net (89.22.99.37:80)
glibc_gconv.tcz      100% |*******************************|  2832k  0:00:00 ETA
glibc_gconv.tcz: OK
Downloading: mtools.tcz
Connecting to repo.tinycorelinux.net (89.22.99.37:80)
mtools.tcz           100% |*******************************|   176k  0:00:00 ETA
mtools.tcz: OK
Downloading: dosfstools.tcz
Connecting to repo.tinycorelinux.net (89.22.99.37:80)
dosfstools.tcz       100% |*******************************| 57344   0:00:00 ETA
dosfstools.tcz: OK
Downloading: tc-install.tcz
Connecting to repo.tinycorelinux.net (89.22.99.37:80)
tc-install.tcz       100% |*******************************| 12288   0:00:00 ETA
tc-install.tcz: OK
tc@box:~$
3.3 Start the installation using the following command –
sudo tc-install.sh
3.4 You will get following option on the console. Type “c” to select the CD Rom as installation source –
Core Installation.
Install from [R]unning OS, from booted [C]drom, from [I]so file, or from [N]et. (r/c/i/n): c
3.5 On next screen, select Frugal by typing “f” to install the OS on local Hard Disk –
Select install type for /mnt/sr0/boot/core.gz

Frugal
* Use for frugal hard drive installations.
Note: You will be prompted for disk/partion and formatting options.

HDD
* Use for pendrives. Your BIOS must support USB-HDD booting.
* A single FAT partition will be made.
Note: Requires dosfstools extension.
Warning: This is a whole drive installation!

Zip
* Use for pendrives. Drive will be formatted into two FAT partitions.
* One small one for USB_ZIP boot compatibility, and used to hold Tiny Core.
* The remaining partition will be used for backup & extensions.
Note: Requires dosfstools and perl extensions.
Warning: This is a whole drive installation!

Select Install type [F]rugal, [H]DD, [Z]ip. (f/h/z): f
3.6 On next screen, select option “1” to use the whole disk for the OS and packages –
Select Target for Installation of core

 1. Whole Disk
 2. Partition

Enter selection ( 1 - 2 ) or (q)uit: 1
3.7 On next screen, select option “2” to select the local installation disk –
Select disk for core

 1. fd0
 2. sda

Enter selection ( 1 - 2 ) or (q)uit: 2
3.8 On next screen, select “y” to install a local bootloader on the local disk –
Would you like to install a bootloader?
Most people should answer yes unless they are trying to embed Core
into a different Linux distribution with an existing bootloader.

Enter selection ( y, n ) or (q)uit: y
3.9 Type “n” for local extension installation option (you can install the extensions later) –
Install Extensions from this TCE/CDE Directory: n
3.10 On next screen, select option “4” for ext4 disk format –
Select Formatting Option for sda

 1. ext2
 2. ext3
 3. ext4
 4. vfat

Enter selection ( 1 - 4 ) or (q)uit: 3
3.11 On next Screen, add options for display resolution and TCE App restore directory (“vga=788 tce=hda1“) –
Enter space separated boot options:
Example: vga=normal syslog showapps waitusb=5
vga=788 tce=hda1
3.12 On next screen, select “y” to trigger the installation process –
Last chance to exit before destroying all data on sda
Continue (y/..)?
On successful installation, you should see something like following on your console/screen –
Writing zero's to beginning of /dev/sda
Partitioning /dev/sda
Formatting /dev/sda1
1+0 records in
1+0 records out
440 bytes (440B) copied, 0.000846 seconds, 507.9KB/s
UUID="FA02-C854"
Setting up core image on /mnt/sda1
Applying syslinux.
Installation has completed
Press Enter key to continue.
3.13 After successful Tiny Core Linux installation on your machine’s local disk, you should change the Boot Sequence in your machine’s BIOS Settings, so that the OS can boot from the local disk.
Conclusion:
You can also consider running Tiny Core directly from the CD / USB drives as it will protect system files from changes and ensures a pristine system on every reboot. Tiny Core loads itself into RAM from storage, then mounts applications on storage, or installs applications to RAM from storage. With its tiny size, Tiny Core has great potential for embedded systems and the Internet of Things, where you always have to deal with resource constrained hardware devices.

Oh wow. This helped me so much. Has been looking online for quite a while and this page solved it for me! Thanks again. 🙂
LikeLike