
Pradeep Singh | 1st Dec 2017
![]()
Analog Modems may sound a bit old-fashioned, but they still hold their value for certain applications. In this article, I will explain how to connect and test USB analog modem with Raspberry Pi.
Before you begin with this article or purchase a new analog modem, you should understand the difference between the Hardware Modems and Software Modems.
Software Modems or softmodems depend on the software running on a computer for most of the data/voice handling logic and hardware components like CPU and RAM. Softmodems are also known as Winmodems as they were originally designed to work with Microsoft Windows Operating System. As the hardware components are minimal, Softmodems are cheaper than Hardware Modems, but they don’t work properly with Linux based computers.
Hardware modems, on the other hand, have their own onboard controllers and don’t depend on the computer software as heavily as softmodems for data/voice handling logic. Since the Hardware Modems have additional hardware components, they are more expensive compared to the Softmodems, but they work well with Linux based computers.
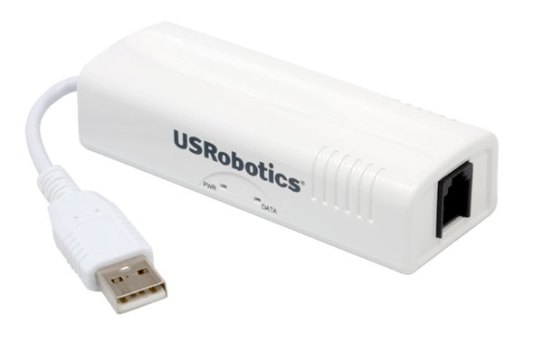
Considering the limitations of Softmodems, I bought a USRobotics USR5637 USB Modem for the Raspberry Pi as shown in the following image –
After connecting the hardware modem with the Raspberry Pi, you can follow the following steps to configure and test it –
1. Enable Serial Interface on the Raspberry Pi:
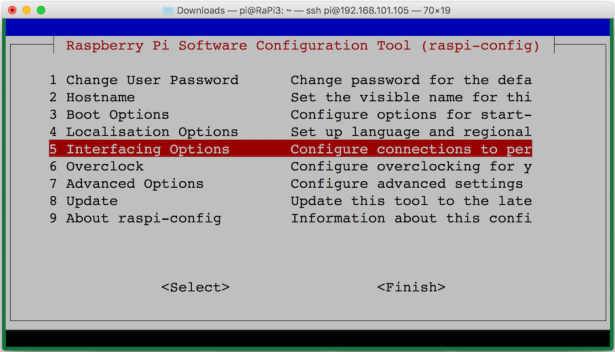
From the Raspberry Pi shell prompt, execute the following command to get into the configuration tool –
sudo raspi-config
You should see following the following screen. Select the “Interfacing Options” in this window –
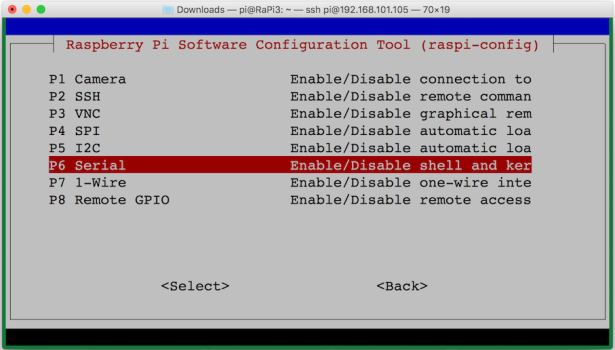
On the next screen, select the “P6 Serial” option –
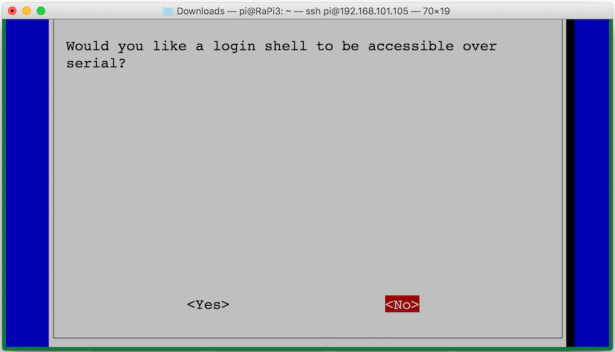
If your use cases need access to Raspberry Pi shell over the serial port, you can select “yes” on the window otherwise select “No” –
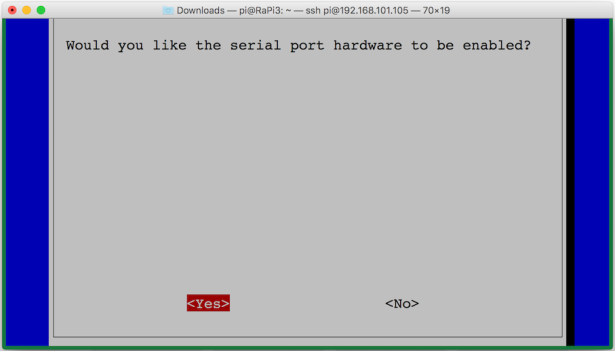
To allow the modem to communicate with Raspberry Pi, select “Yes” on the following screen –
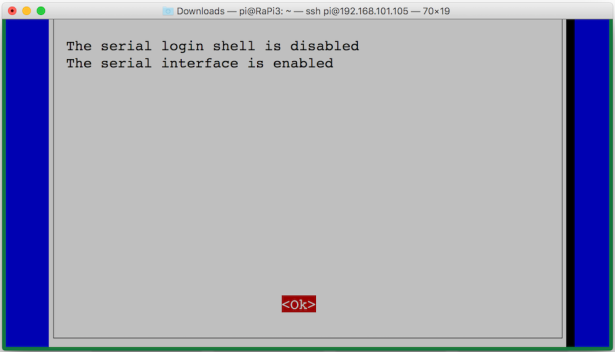
Based on the values selected on previous windows, your serial port configuration summary should look as shown in the following screenshot. Select “OK” to proceed further –
Select “Finish” on the home screen as shown in the following screenshot to go back to the command prompt –

2. Locate COM Port associated with the Modem:
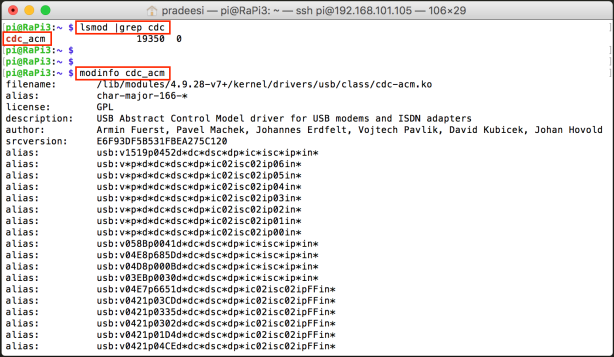
If your modem is properly connected with the Raspberry Pi and detected by Linux kernel, you should be able to see the driver information using the “lsmod |grep cdc” command as shown in the following screenshot –
To identify the COM port associated with the Modem you can refer to the following screenshot.
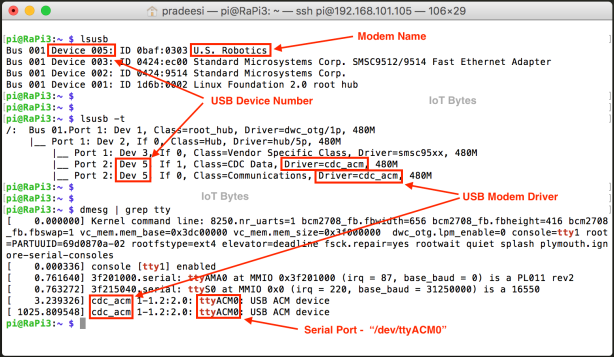
You can list all the USB Devices using the “lsusb” command. As I am using the U.S. Robotics modem, you can see it in the “lsusb” command output.
Take a note of “Device Number” and map that with “lsusb -t” command output. You should be able to map the Device Number (for ex- Dev 5) with the Driver Name (For Ex – cdc_acm).
Now use “dmesg | grep tty” command to list all the kernel messages for the serial devices and map the Driver Name (For Ex – cdc_acm) with the COM port (For Ex- ttyACM0). As all the serial devices are listed under Linux “/dev” directory, add “/dev” prefix with the COM Port. For my example, the COM port that I will use is – “/dev/ttyACM0”
Now you can use any application that can interact with the COM ports and test your modem connection. Here, I will use “minicom” to test the connection with the Modem using the “AT” commands.
3. Test Modem Connection Using Minicom:
Minicom is a text-based modem control and terminal emulation program for Unix-like operating systems. You can install Minicom on Raspberry Pi using the following command –
sudo apt-get install minicom
After installation, you can configure “minicom” connection settings to communicate with the analog modem over the serial COM port. From the Raspberry Pi shell prompt execute the following command –
minicom -s
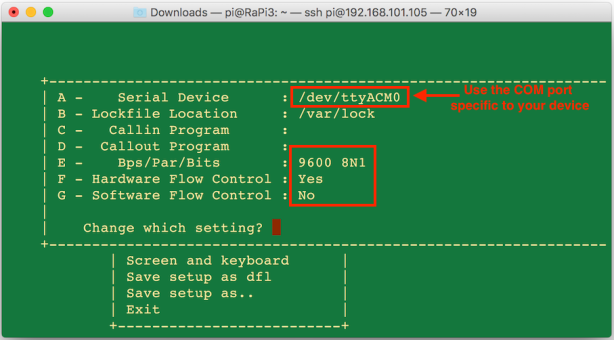
This will open a minicom configuration utility. Select the “Serial port setup” on this window and configure COM port settings as shown in the following screenshot –
After setting the default COM port settings on the minicom application, you can open it from the Raspberry Pi shell using the following command –
minicom
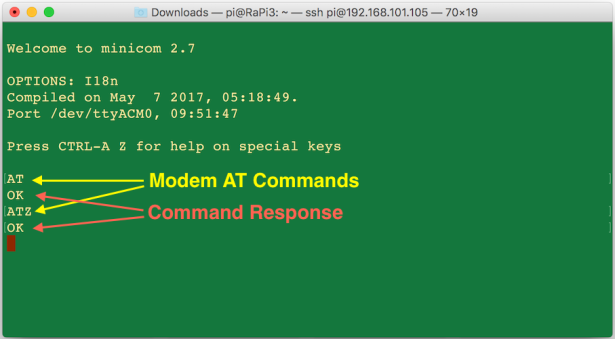
If your settings are correct, “minicom” command will open an interactive shell for you, where you can issue the modem specific command and see the response.
To keep this article simple I will use two commands, first one is “AT” command, which is the most basic AT command to check if the modem is live; and the second one is “ATZ” which resets the modem settings to factory default. For most of the AT commands, the modem will respond with “OK“. So if you see, “OK” on the minicom terminal, you are communicating with the modem without any issue.
Following screenshot shows the AT commands and the modem response –
Now you have a working USB analog modem with your Raspberry Pi and it can be used for the advanced applications like a call detail logger, voice mail system, a dialer or your personal IVR system.
Related Articles:
Record Audio from Phone Line with Raspberry Pi
Play Audio File on Phone Line with Raspberry Pi
Incoming Call Details Logger with Raspberry Pi
Python Script to Reset USB Modem COM Port on Raspberry Pi
Python Script to Autodetect Modem COM Port on Raspberry Pi
References:
Wikipedia – Voice modem command set
USRobotics 56K USB Modem Voice Commands
USRobotics 56K USB Modem – Data and General Commands
Voice +V Commands – Developer’s Guide

Thank you for this Pradeep ! Is it possible to open audio channels to the USR5637 from the Raspberry Pi? I’d like the Pi to set the modem on and off hook, detect hook status, and send/receive audio from/to the Pi. I have an application where I’m trying to duplicate the Jolly Roger system for a home POTS line. I want the Pi to “listen” to incoming audio and “respond” with generated audio. I was hoping the USR5637 could facilitate that. Thank you!
LikeLike
Hi Calvin, Yes all of this is possible with USR5637 Modem. For details you can refer to the following Voice AT Command guide from U.S. Robotics –
http://support.usr.com/support/5637/5637-ug/ref_voice.html
I was able to implement some of these functionalities with Python scripts.
LikeLike
Could you give some examples of playing sound over the modem? I have the need to take the modem off hook, dial two numbers, play a mp3/wav/ogg file, and then hang up the line.
LikeLike