
Pradeep Singh | 10th Sep 2017
In this article, we are going to see how to create a custom Docker Image using Dockerfile, that can interact with the GPIO Pins and performs some operation on the Raspberry Pi. To keep the things simple we will try to blink an LED connected to the Raspberry Pi with a basic Docker Container. So let’s begin and create our first Container for Raspberry pi –
1. Install Docker on Raspberry Pi:
Before you begin with this article you should install Docker on your Raspberry Pi. I have covered the Docker installation on Raspberry Pi in the following article –
Setup Docker on Raspberry Pi and Run hello-world Container
2. Select the Base Image for Dockerfile:
Once you are done with the Docker installation, you need to create a Dockerfile for the new Docker Image that can blink the LED connected to your Raspberry Pi. Docker can build images automatically by reading the instructions from a Dockerfile.
Most of the times we start Dockerfile with a base image (sometimes called as Parent Image). You can find most of the Docker Base Images on the official Docker Hub. You need to be careful while selecting the base image for your new Docker Image, as most these bases images are created for specific CPU Architectures. You can find the list of different CPU Architectures and their respective Docker Hub URLs from the following link –
https://github.com/docker-library/official-images#architectures-other-than-amd64
You can use the “cat /proc/cpuinfo | grep model” command on your Raspberry Pi to find the CPU Architecture and use the corresponding Docker Hub repository –
pi@RaPi3:/ $ cat /proc/cpuinfo | grep model
model name : ARMv7 Processor rev 4 (v7l)
model name : ARMv7 Processor rev 4 (v7l)
model name : ARMv7 Processor rev 4 (v7l)
model name : ARMv7 Processor rev 4 (v7l)
pi@RaPi3:/ $
Now, if you are using Rasbian, you may have “jessie” or “wheezy” variants. You can run the “cat /etc/os-release” command to see the Linux details on your Raspberry Pi –
pi@RaPi2:~/docker_test $ cat /etc/os-release
PRETTY_NAME="Raspbian GNU/Linux 8 (jessie)"
NAME="Raspbian GNU/Linux"
VERSION_ID="8"
VERSION="8 (jessie)"
ID=raspbian
ID_LIKE=debian
HOME_URL="http://www.raspbian.org/"
SUPPORT_URL="http://www.raspbian.org/RaspbianForums"
BUG_REPORT_URL="http://www.raspbian.org/RaspbianBugs"
pi@RaPi2:~/docker_test $
Based on this command outputs from my Raspberry Pi which shows the CPU architecture asARMv7 and Rasbian Jessie OS, I am going to use “arm32v7/python” base image with tag “2.7.13-jessie” which is available at the following link (you can also use the default image with tag “2.7” that will make the image name as “arm32v7/python:2.7“) –
https://hub.docker.com/r/arm32v7/python/
3. Create a New Directory on Raspberry Pi:
Create a new directory for all the files that you will use for creating a new Docker Image and get into this new directory. Let’s name it “docker_test” –
mkdir docker_test
cd docker_test
4. Create a Python Script to Blink an LED:
Create a Python Script to blink the LED with the name “led_blinker.py“, using the following code and save it in the “docker_test” directory created in the previous step –
import RPi.GPIO as GPIO
import time

# Configure the PIN # 8
GPIO.setmode(GPIO.BOARD)
GPIO.setup(8, GPIO.OUT)
GPIO.setwarnings(False)

# Blink Interval
blink_interval = .5 #Time interval in Seconds

# Blinker Loop
while True:
 GPIO.output(8, True)
 time.sleep(blink_interval)
 GPIO.output(8, False)
 time.sleep(blink_interval)

# Release Resources
GPIO.cleanup()
5. Create Dockerfile:
Create a new file in the “docker_test” directory with the name “Dockerfile“, using the following contents –
# Python Base Image from https://hub.docker.com/r/arm32v7/python/
FROM arm32v7/python:2.7.13-jessie

# Copy the Python Script to blink LED
COPY led_blinker.py ./

# Intall the rpi.gpio python module
RUN pip install --no-cache-dir rpi.gpio

# Trigger Python script
CMD ["python", "./led_blinker.py"]
If you need more information about Dockerfile, you can refer to the Dockerfile reference from the following URL –
https://docs.docker.com/engine/reference/builder/
6. Create Docker Image from Dockerfile:
Create Docker Image with the image name as “docker_blinker” and tag as “v1” using the following command –
docker build -t "docker_blinker:v1" .
Once the command execution gets completed you should be able to list the image on your Raspberry Pi using the following command –
docker image ls
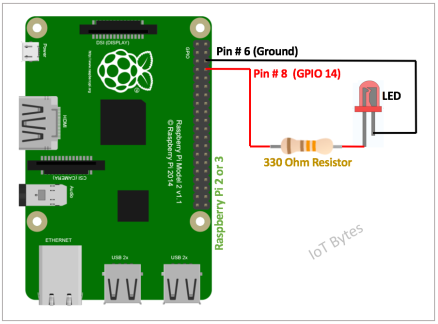
7. Prepare the Circuit:
Connect an LED via a 330 Ohm register (or any value between 200 – 300 Ohm) to Raspberry Pi GPIO Pins, as shown in the following image –
8. Start the Container to Blink the LED:
As we are interacting with the hardware components i.e. the GPIO Pins on the Raspberry Pi from this Container, we need to use “docker container run” command with either the “--privileged” option or by specifying the Linux GPIO Device (“/dev/gpiomem“) using the “–device” option.
You can use one of the following commands to run the Docker Container, which in turn would blink the LED connected to your Raspberry Pi –
docker container run --device /dev/gpiomem -d docker_blinker:v1
or
docker container run --privileged -d docker_blinker:v1
9. Use Docker Hub to Share Container Image (Optional Step):
You can upload this image on any Container Registry and share it with other devices/users. To keep things simple I will use Docker Hub for this article. If you don’t have a Docker Hub ID, you can register on Docker Hub and create one.
9.1 Login to Docker Hub from Raspberry Pi using the “docker login“command. Use your Docker ID and password to at the login prompt.
9.2 Re-tag your container image to add your Docker Hub ID with it, using the “docker image tag SOURCE_IMAGE[:TAG] DOCKER_HUB_ID/TARGET_IMAGE[:TAG]” command. For Example, my docker id is “pradeesi“, so the command that I would use is “docker image tag docker_blinker:v1 pradeesi/docker_blinker:v1”
9.3 Now you can upload the container image to Docker Hub using the “docker image push DOCKER_HUB_ID/IMAGE_NAME:TAG”. I would use the command “docker image push pradeesi/docker_blinker:v1“
9.4 With this your image is ready to be pulled on any Raspberry Pi. If you have another Raspberry Pi you can pull this image using the “docker image pull DOCKER_HUB_ID/IMAGE_NAME: TAG“. If you want to pull my image you can use the “docker image pull pradeesi/docker_blinker:v1” command.
9.5 Once you have this image pulled onto a new Raspberry Pi, you just need to connect the LED to the GPIO pins as explained earlier in this article, and start the container to blink the LED. You need not write any code or install any libraries.
Conclusion:
With this article, you might have got the idea about the Docker Images and Containers. If you have any questions related to this article, please feel free to ask.
References:
https://blog.alexellis.io/gpio-on-swarm/
https://docs.docker.com/engine/reference/builder/
https://docs.docker.com/engine/reference/commandline/build/

Nice tuto,
But I have a question. Let’s imaging that now I have a container with another script in a docker container.
By example an alarm clock, and when the alarm clock ring I want to make the led blink (and use your docker container). How can I do that? what’s the easiest way or what are the best practices? thanks you!
LikeLike
If you want to blink the LED when the Alarm Clock rings, you will have to change the logic in your code. Once the changes are made in the code, you can change the “Dockerfile” and create a new Docker Image.
LikeLike
Hello,
OK thanks, I tough I can have one docker image with the alarm clock and one docker image with the blink led code and have them communicate somehow.
Thanks you
Florian
LikeLike
For Container to Container communication you may consider Micro Service Architecture (you will have to modify the code for my container app to expose a REST API to start or stop the LED blinking).
LikeLike