
Pradeep Singh | 30th Jun 2018
![]()
If you are struggling to connect USB Microphone or Speaker (or a headset with microphone) with Raspberry Pi, this article may help you.
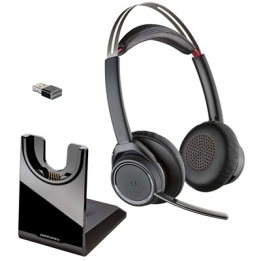
For this article, I am going to use Plantronics BT600 headset with Bluetooth USB dongle, as shown in the following picture. However, if you want to use a different Headset/Speaker and Microphone with Raspberry Pi, the configuration steps would remain same.
1. Check If the Device is Detected by Raspberry Pi:
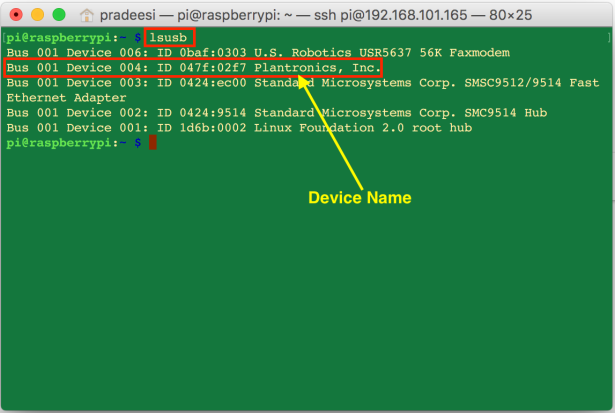
Before you start, you need to check if your USB device is detected by the Raspberry Pi. To do this, you can use the “lsusb” command. Locate the device manufacturer name in the command output as shown in the following output (If you don’t see your device in the command output, either your device is faulty or the device driver is not available for it.) –
2. List Available Playback Devices (Speaker) and Locate Card Number and Device Number:
The next step is to locate the correct Playback Device (Speaker) Card and the Device Number. You can use the “aplay -l” command to list all the playback devices available on your Raspberry Pi. Locate the device with the same Manufacturer name as you found in the previous step, and note down the card number and device number for it.

3. List Available Recording Devices (Microphone) and Locate Card Number and Device Number:
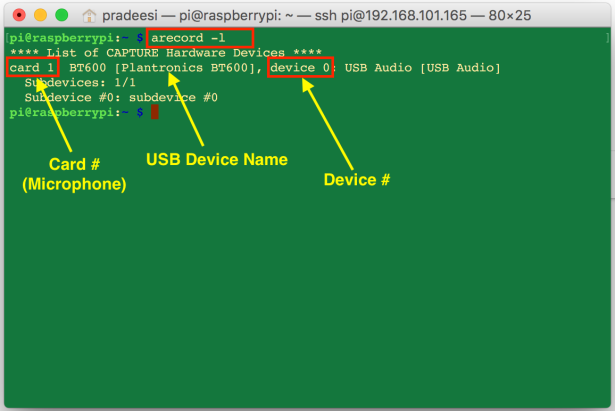
The next step is to locate the correct Recording Device (Microphone) Card and the Device Number. You can use the “arecord -l” command to list all the playback devices available on your Raspberry Pi. Locate the device with the same Manufacturer name as you found in the “lsusb” command output, and note down the card number and device number for it.
4. Set your Recording and Playback Device as the Default PCM Devices:
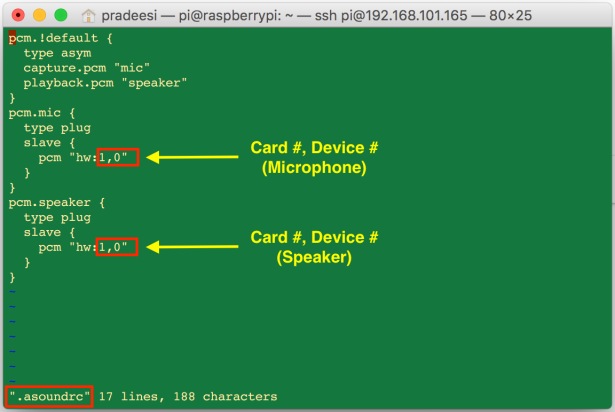
At this stage, you should have the Card Number and the Device Number for you Recording and Playback devices. You can now use the following configuration template and replace “card number” and “device number” for the Mic and Speaker sections –
pcm.!default {
  type asym
  capture.pcm "mic"
  playback.pcm "speaker"
}
pcm.mic {
  type plug
  slave {
    pcm "hw:<card number>,<device number>"
  }
}
pcm.speaker {
  type plug
  slave {
    pcm "hw:<card number>,<device number>"
  }
}
After making the changes you can paste this configuration in “.asoundrc” file under your Raspberry Pi home directory (/home/pi). For global configuration, you may add this config to “/etc/asound.conf” directory. Your configuration should similar to the config shown in the following screenshot with your respective “card number” and “device number” values –
5. Test your Playback Device (Speaker/Headset):
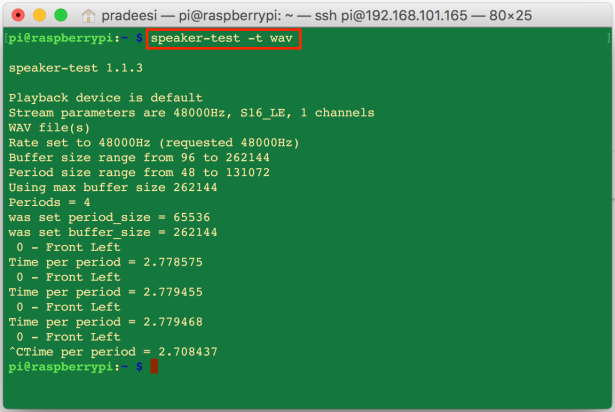
You can now test your playback device using the “speaker-test -t wav” command as shown in the following screenshot. You should be able to hear a sample test audio on your speaker/headset.
Use the following command to test dual channel playback (left and right) –
speaker-test -t wav -c 2
6. Test your Recording Device (Microphone):
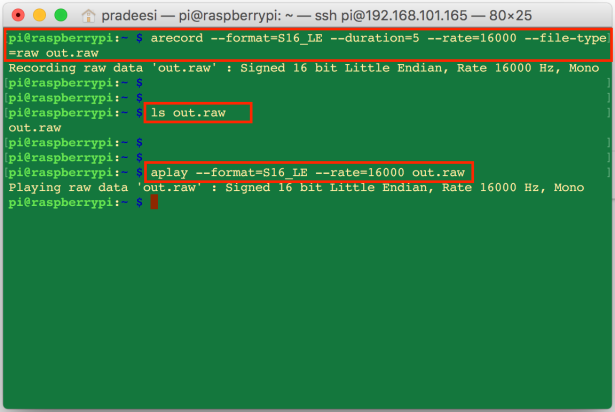
To test your Microphone you can use the following command to record a small audio file in raw format with the length of 5 seconds –
arecord --format=S16_LE --duration=5 --rate=16000 --file-type=raw out.raw
To play the recorded file you can use the following command –
aplay --format=S16_LE --rate=16000 out.raw
You can see the terminal output for these commands in the following screenshot –
7. Microphone and Speaker Volume Control:
You can use the following command to set the volume of your playback and recording devices –
alsamixer
if you have multiple sound cards you can use the “-c” option with “alsamixer” command to specify the Card Number (replace “card number” with the audio card you want to control) –
alsamixer -c "card number"
8. Stream Audio from Microphone to the Speaker:
Just for fun, you can also stream (pipe) the audio from the Microphone to your Speaker using the following command –
arecord --format=S16_LE --rate=16000 | aplay --format=S16_LE --rate=16000
What Next?
With this your playback and recording devices are ready. Now you can use it with any audio playback or recording software or control audio streams using the “pyaudio” package for python –
https://people.csail.mit.edu/hubert/pyaudio/

I have spent countless hours scouring the internet for a solution to my headset not working. Many offered very similar solutions to yours but none worked…UNTIL NOW! THANK YOU AND GOD BLESS YOU
LikeLike
Thanks Adam 🙂
LikeLike
AMEN!! I second that!
LikeLike
Thanks a lot for your instructions.
I would like to ask you a question. For playback device, if I wanna test with analog one (connected to 3.5mm jack), what commands should i use?
LikeLike
This worked on my Pi 3 B+ (Raspbian) using a Jabra Evolve 65 headset over wired USB…WITH the following changes:
** aplay & arecord rates set to 48000 Hz
** Make “.asoundrc” in “/home/pi” READ ONLY (sudo chmod 0444 ./.asoundrc) per this helpful tip (Mike, at the end of the thread): (https://raspberrypi.stackexchange.com/questions/54199/my-asoundrc-is-modified-every-reboot)
After those changes, I could hot-swap the USB cable to the various ports and still use the headset, and also retain my config over reboot. Hopefully this helps someone !
LikeLike
Whenever I make”.asoundrc” read only my menu bar gos away and wont come back until I change the permissions back and reboot.
LikeLike
Hello ,
I m trieing to record some audio data with my PI 3 b+, with a HyperX Cloud 2 Headset, but when i play the raw or MP3 datatype the only thing i hear are extreamly loud noises.
LikeLike
Your microphone or speaker may not have correct settings. You may check and adjust your audio device settings using ‘alsamixer’ command.
LikeLike
This was GOLD!
LikeLike
Greatly helpful article! Spent a few days debugging a Darkice / Icecast Raspberry pi install only to find out that my microphone wasn’t properly configured. Thanks a bunch.
LikeLike